Feel secure and safe in your next bindings
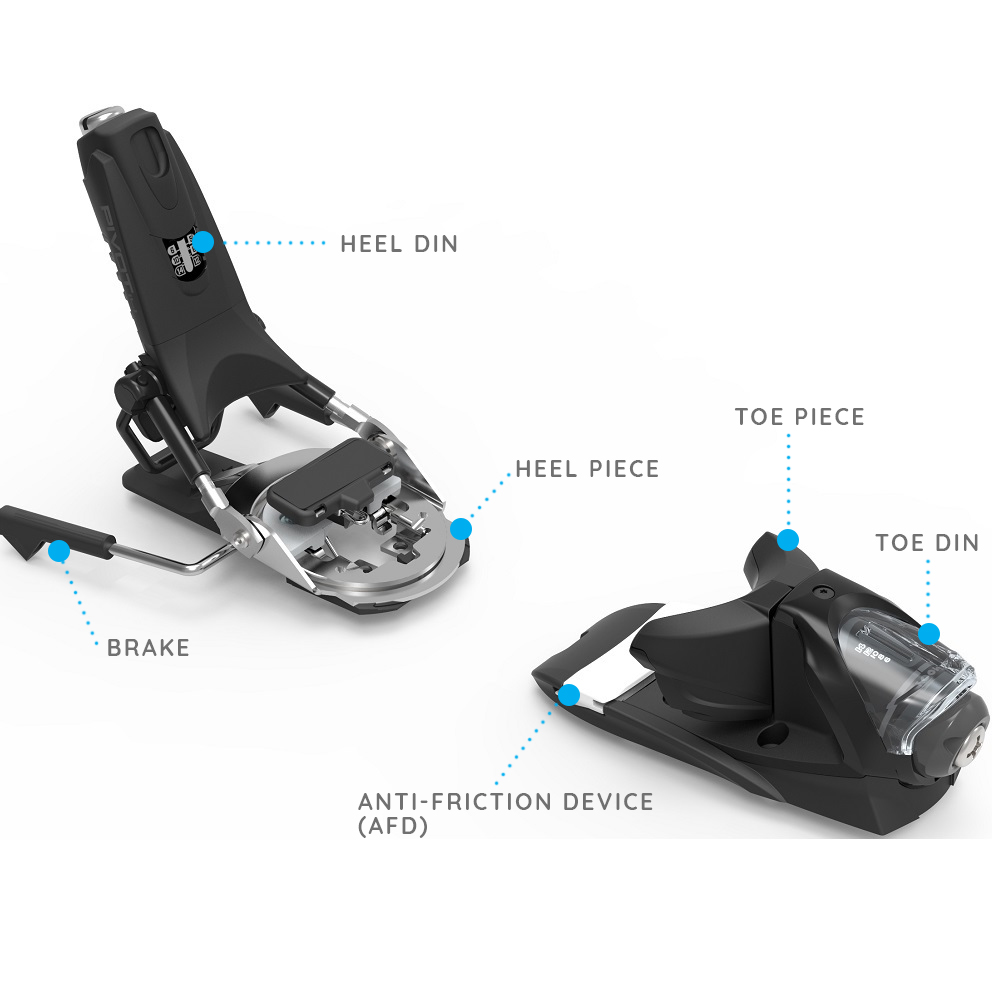
Ski Bindings play a vital role in your skiing equipment. Not only do they connect your boots to your skis, they are also a very important piece of safety equipment. The right bindings, set to the correct settings will hold you in place while you ski and release your boot when the set amount of force is applied. To narrow down your search for an appropriate binding, you’ll want to factor in the Brake Width, the DIN setting to match your skier profile and the type of Binding you need.
Only need info on a specific topic? Jump down to what you're looking for:
01. Basics & Components
-Brakes
-DIN
-Heel & Toe Piece
-AFD
-Other Features
02. Binding Type
03. Mounting & Setting
04. Maintenance
BASICS & COMPONENTS![]()
As we outlined above, there are two major factors that will narrow down your binding search.
1. Your ski’s waist width; the brake of the binding has to be compatible
2. Your DIN setting; it must fall between the DIN range of your selected binding
We’ll get into the specifics of both of these elements to help you make an informed decision; however this guide is only intended for informational purposes. Please give us a call if you need help selecting a binding or consult a certified ski technician to find your DIN setting.
BRAKES![]()
DIN (RELEASE FORCE SETTING)![]()
As important as it is for your binding to release at the right moment, it’s equally important for it to hold you in when you need it to. This is precisely what the DIN setting will help the binding achieve based on a number of factors. DIN comes from Deutsche Industrie Norm, a set of German standards that has long been in place in the ski industry.
Your perfect DIN setting takes into consideration your height, age, weight, skier type/ability level and boot sole length. As you can imagine, the formula to get to that appropriate number can be quite complex. Your DIN should be calculated and set by a certified ski technician.
The lower the DIN, the less pressure it takes to release. Bindings come with a DIN range typically somewhere around 3-10 for intermediate skier and 6-14 for more advanced skier but ideally, you want your DIN to be closer to the middle of that range rather than at either end of its limits.
DIN RANGE RECOMMENDATION
| SKIER WEIGHT (LBS) | ABILITY LEVEL | SKIER PROFILE | DIN RANGE |
|---|---|---|---|
| 26-65 | Beginner-Intermediate | Ligthweight Children | 0.5-2.5 |
| 30-100 | Beginner-Intermediate | Junior Skier | 0.75-4.5 |
| 50-165 | Beginner-Intermediate | Heavier Beginner or more Advanced Junior Skier | 2-7 |
| 65-200 | Beginner-Intermediate | More Advanced Junior Skier or Lightweight Adult Beginner | 3-10 |
| 65-240 | Beginner-Advanced | Beginner Skier or Lightweight more Advanced Adult Skier | 3-11 |
| 65-250 | Intermediate-Expert | Heavier Intermediate Skier or Lightweight Expert Adult Skier | 3-13 |
| 130-285 | Intermediate-Expert | Heavier or more aggressive Intermediate Skiers or Expert Adult Skiers | 6-14 |
| 130-200+ | Intermediate-Expert | Heavier, aggressive Intermediate Skier or very aggressive Advanced-Expert Adult Skiers | 6-16 |
| 150-200+ | Expert-Pro | Aggressive Expert, Big Mountain Skiers and Racers | 8-18 |
*Please note that this chart is only to give you an idea of the DIN range that may be appropriate for you to help you narrow your search down. As we mentioned above, do not try to adjust the DIN on your bindings yourself and if you’re unsure about your DIN, please give us a call.
HEEL & TOE PIECE![]()
The toe and heel pieces make up the bulk of the binding. In the case of a fall, the toe piece releases sideways and sometimes upwards, while the heel piece releases multi-directionaly.
AFD (ANTI-FRICTION DEVICE)![]()
The Anti-Friction Device is a smooth piece that sits under your boot on the toe piece of the binding. The purpose of the AFD, which is sometimes a sliding piece, is to reduce friction in the event that your bindings release laterally.
OTHER FEATURES![]()
Lifters: Designed primarily for racers and carvers, lifters are used to add a bit of height under the binding to help with edge hold.
Elastic Movement: Elastic Movement in a binding is used to reduce the likelihood of your binding releasing inadvertently. The elastic movement allows some vertical and lateral flexibility and also provides added shock absorption during landings. The range of elasticity varies from one model to the next.
BINDING TYPES![]()
MOUNTING & SETTING![]()
MOUNTING![]()
Where the binding is mounted onto the ski can affect the performance and the feel of the ski. Most ski manufacturers have a recommended mounting position for each ski model and a qualified ski shop such as our Pro Shop here at Corbetts will mount them as suggested. Setting the bindings too far back makes them quite stiff. For ladies and Freestyle skiers it may be beneficial to mount the bindings a little bit forward from center. Your bindings should only be mounted by a certified ski technician.
SETTING![]()
Once your bindings are mounted, your DIN (release settings) needs to be set and tested. Again, have this done by a certified technician. They will have you fill out a form with all the information they need to set an appropriate DIN. It’s good practice to have your bindings checked and tested at the beginning of every season.
MAINTENANCE![]()
Your ski bindings should be relatively maintenance free. Keep dirt and salt out of your bindings but don’t attempt to wash them as you may remove lubricant that is key in the functioning of the binding. Store your skis in a dry and warm place during the off-season and as we mentioned above, have your bindings inspected at the beginning of every season.
• • •
Still have some questions? We've got an extremely knowledgeable and friendly team at Corbetts. Visit us at our retail location or give us a call and we'll help you find the perfect bindings to fit your needs.
Need help with more skiing gear? Check out our other Ski Buying & Sizing Guides.


